I’ve been deep in the AI-assisted development world lately, and Claude Code has completely transformed how I build. After splurging on the Max plan ($100/month), I’ve been pushing it hard – using it to bootstrap entire WordPress plugins, debug complex issues, and refactor legacy code.
The unlimited usage has been a game-changer (only hit the limit once, briefly switching from Opus to Sonnet, which still worked great).
What makes Claude Code special isn’t just the AI – it’s the full context awareness. Unlike browser-based AI, it can:
- Edit multiple files simultaneously
- Run terminal commands directly
- Search through entire codebases for errors
- Understand your project structure completely
The time savings? Countless hours already. Tasks that used to take me hours now take minutes.
But here’s the thing – powerful tools need smooth workflows. I found myself constantly switching between Local (by WPEngine), VS Code, and Claude Code when working on WordPress sites. So I built a simple integration that streamlines everything.
The Challenge
When developing WordPress sites with Local, I found myself constantly switching contexts:
- Local provides an excellent isolated WordPress environment
- Claude Code offers incredible AI assistance for development
- VS Code is where I do my actual coding
- WP-CLI is essential for WordPress development tasks
The challenge was bringing these tools together seamlessly. I wanted Claude to understand my WordPress environment, have access to WP-CLI commands, and work from the project root (not just the WordPress directory) so it could access logs and configuration files.
Why This Approach?
After exploring several options, including:
- Trying to automate Local’s SSH entry scripts
- Attempting to parse Local’s
sites.jsonto find the right environment - Building complex shell scripts to bridge the tools
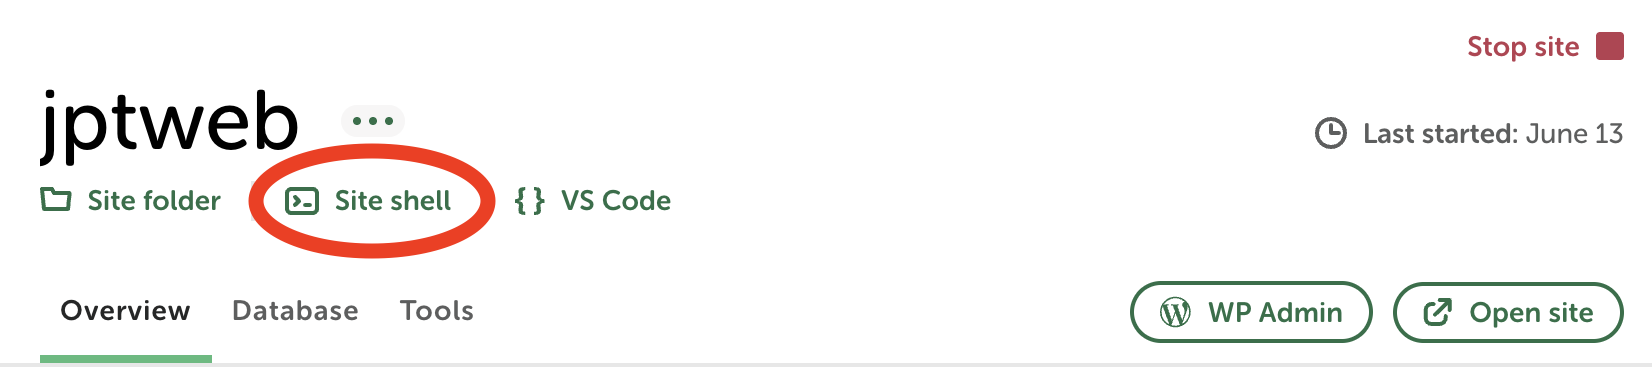
I realized the simplest solution was often the best. Local’s “Site Shell” button does all the heavy lifting of setting up the WordPress environment, including database connections and WP-CLI access. Instead of trying to recreate this, I decided to work with it.
The Secret Sauce: Pre-Primed Context
The real magic happens after you launch Claude and type /wordpress-local. This provides Claude with a comprehensive understanding of your WordPress environment before you even ask your first question. This pre-prompt includes:
- Your exact directory structure (project root vs. WordPress root)
- How to properly run WP-CLI commands from any location
- Where to find error logs and configuration files
- Common WordPress development patterns and best practices
This means Claude starts every session already knowing it’s working with WordPress in Local, understanding your file structure, and knowing exactly how to execute commands. You don’t have to explain your setup – you can jump straight into development tasks.
Why Not Install WP-CLI Globally?
While installing WP-CLI globally is an option, using Local’s built-in version offers key advantages:
- Automatic compatibility: Local provides the exact PHP and WP-CLI versions your site needs
- Zero setup: Everything’s already included with Local
- Site isolation: Each site gets its correct environment (database credentials, PHP version, etc.) automatically
This approach keeps things simple and reliable – just click “Site Shell” and everything works.
Prerequisites
- macOS (tested on macOS Sonoma – may work on other systems with modifications)
- Local by Flywheel installed and running
- Claude Code installed (
brew install claude) - VS Code installed
- Basic familiarity with terminal/command line
The Solution: Simpler Setup with Global Commands
Note: I updated this blog on 6/16 with a new approach one where we don’t need to create custom commands in our .zshrc file.
After exploring various approaches, I’ve found an even cleaner solution that doesn’t require editing shell configuration files. Instead, we’ll use Claude Code’s global commands feature to make WordPress context available in any project.
Prerequisites
- macOS (tested on macOS Sonoma – may work on other systems with modifications)
- Local by Flywheel installed and running
- Claude Code installed (
brew install claude) - Basic familiarity with terminal/command line
One-Time Setup
Option A: Automatic bash script
This method automatically creates a Claude Command folder in the Claude system root folder ( ~/.claude/commands) ON MACS ONLY and generates a file in that folder called wordpress-local.md. This creates a command you can now run in claude code by typing /wordpress-local.
Here are the steps:
- Create a file using the terminal anywhere on your computer called setup-claude-wordpress.sh
nano setup-claude-wordpress.sh
- Copy the contents from the bash script below.
- Execute the bash script from a terminal by running:
sh setup-claude-wordpress.sh
- Delete the setup script after you run it as it isn’t needed anymore
rm setup-claude-wordpress.sh
Contents of setup-claude-wordpress.sh that you can copy in from step 2:
#!/bin/bash
# Save this as: setup-claude-wordpress.sh

echo "Setting up global WordPress command for Claude Code..."

# Create global commands directory
mkdir -p ~/.claude/commands

# Create the global WordPress context command
cat > ~/.claude/commands/wordpress-local.md << 'EOF'
I'm working on a WordPress site using Local (by Flywheel). The environment is fully configured with WP-CLI available.

CRITICAL - CURRENT SETUP:
- You are at the PROJECT ROOT: not in the WordPress directory
- WordPress installation is in: ./app/public/
- PHP error logs are in: ./logs/php/error.log
- To run WP-CLI commands, you MUST EITHER:
  a) cd app/public && wp [command]
  b) Use: (cd app/public && wp [command])

BUILD ISSUES:
- NODE_ENV is already set to: development
- For npm builds, always ensure NODE_ENV=development

DIRECTORY STRUCTURE:
.
├── app/
│   └── public/         # WordPress root (WHERE WP-CLI WORKS)
│       ├── wp-content/
│       ├── wp-config.php
│       └── ...
├── logs/
│   ├── nginx/
│   └── php/
│       └── error.log   # PHP errors
└── conf/               # Local configuration

WORKING WITH WP-CLI FROM PROJECT ROOT:
Since we're at project root, use subshell for WP-CLI:
- (cd app/public && wp plugin list)
- (cd app/public && wp cache flush)
- (cd app/public && wp db query "SELECT * FROM wp_options LIMIT 5")

EXAMPLES:
# Check logs from project root
cat logs/php/error.log

# Run WP-CLI from project root
(cd app/public && wp plugin list --status=active)

# Work on a plugin
cd app/public/wp-content/plugins/my-plugin
npm install

Please acknowledge that you understand you're at the project root and must run WP-CLI commands from app/public.
EOF

echo "Global WordPress command installed!"
echo ""
echo "How to use:"
echo "   1. Open any Local site's Site Shell"
echo "   2. Navigate to project root: cd ../.."
echo "   3. Run: claude"
echo "   4. Type: /wordpress-local"
echo ""
echo "That's it! No shell configuration needed."
Option B: Manual setup
You can also manually create a claude global command my adding a .md file in the commands folder of your claude installation. Here is one way you could do this (there are many) in the terminal:
# Step 1
# Create the global commands directory
mkdir -p ~/.claude/commands

# Step 2
# Create the WordPress command file
nano ~/.claude/commands/wordpress-local.md

#step 3 copy the PROMPT only into the wordpress-local-md file (see below)
After step 2 you are editing wordpress-local.md you can go ahead and paste the prompt (just the prompt, not all the stuff from my bash script related to option A) into the file:
Using the Workflow
- In Local, click the “Site Shell” button for your site

- Navigate to the project root (important for accessing logs):
cd ../..
you should now be in a folder like Local/myproject/ as opposed to Local/myproject/app/public - Type ‘
Claude‘ into the terminal which will fire up Claude Code - Inside Claude Code type
/wordpress-localand press Enter- Or type
/to see a menu and selectwordpress-local
- Or type
Alternative Option: Using VS Code and its embedded terminal
If you want to use eventually use VS Code and it’s embedded terminal with this workflow; and want to make opening it as seamless/quick as possible while keeping the power you get from firing up a site shell in Local WP you can take this path. I explain a bit below why we have to click site shell first (I know its a bit convoluted).
One time setup to Ensure the VScode ‘code’ command launches VScode from the terminal
- Open VS Code
- Press
Cmd+Shift+Pto open the command palette - Type “Shell Command: Install ‘code’ command in PATH”
Next we go ahead and open the site shell from Local:
- In Local, click the “Site Shell” button for your site
- Navigate to the project root (important for accessing logs):
cd ../.. - In the terminal enter:
code .
This will launch VS code and hopefully keep the Local interactive shell going. - From the embedded VScode terminal Type ‘
Claude‘ into the terminal which will fire up Claude Code - Inside Claude Code type
/wordpress-localand press Enter
Step 4: Try it out
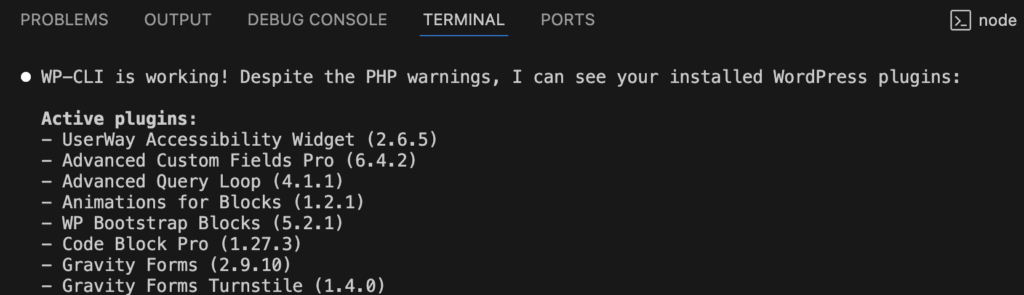
Try this simple command (once Claude Code is running and you are inside Claude Code) to test the integration:
Can you list all the plugins installed on this WordPress site and tell me which ones are active?After running this you should get something like the following image. Notice this only works because Claude is able to run the wp cli commands and interrogate the database. This is useful if you don’t have wp-cli installed globally.
You can also try more complex requests like:
- “Check the PHP error log for any recent issues”
- “Show me the current WordPress version and database prefix”
- “Create a simple custom plugin that adds a dashboard widget”
What Makes This Work?
This simplified approach offers several advantages:
- No shell configuration needed – Works with any shell (bash, zsh, fish)
- One-time setup – Install once, use in any project
- Team-friendly – Easy to share and document
- No permission issues – Claude starts normally without input redirection
- Easily customizable – Just edit
~/.claude/commands/wordpress-local.md
What Makes This Work?
The magic happens because:
- Local’s Site Shell sets up all the necessary environment variables
- Claude Code’s global commands are available in any project
- The command provides Claude with complete context about Local’s directory structure
- No complex shell scripting or permission workarounds needed
Troubleshooting: Database Connection Issues
If you’re getting errors like this when running WP-CLI database commands:
Error: Failed to get current SQL modes. Reason: ERROR 2005 (HY000): Unknown MySQL server host sock.Or:
Error: Can't connect to local MySQL server through socket '/tmp/mysql.sock' (2)This is a known issue with how Local handles MySQL socket connections. Here’s how to fix it:
Solution: Update Your Database Host Configuration
- In Local, click on your site and go to the Database tab
- Find and copy the “Socket” path (it will look something like):
/Users/your-username/Library/Application Support/Local/run/9w23fVSYb/mysql/mysqld.sock - Open your
wp-config.phpfile (located inapp/public/) - Update the
DB_HOSTdefinition by addinglocalhost:before your socket path:
Change this:define( 'DB_HOST', 'localhost' );
To this (using your actual socket path):define( 'DB_HOST', 'localhost:/Users/your-username/Library/Application Support/Local/run/9w23fVSYb/mysql/mysqld.sock' ); - Save the file and test with: bash
wp db query "SELECT DATABASE();"in your site shell.
If it works you should be good to go and upon opening Claude it should be able to do complex database operations.
Other Common Issues and Solutions
Issue: “command not found: wp”
Solution: You’re not in a Local Site Shell. Always click “Site Shell” in Local first.
Issue: Database connection errors
Solution: Make sure you’re in a Local Site Shell, which provides the database credentials.
Issue: Inside Claude I Can’t find / run the the /wordpress-local command
Solution: Ensure the setup script ran successfully and created ~/.claude/commands/wordpress-local.md
The Benefits
With this setup:
- Claude understands your entire project structure instantly
- No need to copy/paste context each time
- Works with any Local WordPress site
- Simple one-command setup that anyone can follow
- No shell configuration or technical complexity
Why Do we have to click “Site Shell First”
You might wonder why we don’t automatically launch the Local environment from any terminal. I explored this extensively, including:
- Parsing Local’s
sites.jsonto find the SSH entry scripts - Attempting to source these scripts programmatically
- Building complex detection mechanisms
The challenge is that Local’s SSH scripts use exec /bin/zsh which replaces the current shell process, making automation complex and potentially fragile.
Share your thoughts
Have questions or suggestions for improving this workflow? Feel free to contact me.
Note: This guide is primarily tested on macOS. Windows users might need to adapt the shell scripts for PowerShell or WSL. Linux users should find most commands work with minor path adjustments.